In the following I explain how to use simple trigonometry with topographic maps to evaluate what elements in landscapes may be within the field of view of given photographic lenses. Most photographers planning to explore destinations they are not familiar with do not perform much if any analysis before a trip about what they might be able to see from given locations or what lenses might be required. They just drive or hike somewhere and when they arrive, evaluate the scene before them for compositions of interest then select an appropriate lens to accommodate the given field of views. Maybe trying several, seeing how the scene looks through each lens. For most situations this style of discovery process works fine. However as time constraints increasingly bear on that effort, there may arise a need to have already evaluated some parameters before a trip in order to work more efficiently. Although I haven't over the years kept up on all the popular yearly "how to" landscape photography books one sees on bookstore shelves, none of those I have perused mention this subject and in fact have little to say about advantages of topographic map use.
For example, lets say one is to visit a lake beside a highway for a sunrise water reflection. The best strategy would be to have visited the area beforehand in order to evaluate various locations to shoot from. However if one will be visiting the location for the first time, one may end up driving about quickly at dawn, evaluating a number of locations before the sun rises. Chances are there may be too little time to do so. Another situation is when one explores by hiking or backpacking from out beyond roads on trails. The ability to evaluate a number of locations requires far more effort because one will need to hike to each potential spot instead of simply driving around in a vehicle. Both the physical effort of carrying all one's gear and time issues of not wasting considerable time hiking about to unproductive locations bare on efficiency. Of course in mountain landscapes the effort hiking around is compounded by having to climb up and down with all that gear. And mountain landscapes are complex with various features rising up at different angles depending on their relative elevations, distances, and other obstructing elements. Because of these issues, I have always spent considerable effort planning my photographic explorations beforehand using topographic maps. Map analysis can improve the chances one will work more efficiently, however it is no replacement for using one's experience once actually seeing landscapes in order to evaluate what plan of action ought best be followed.
USGS Topographic Maps
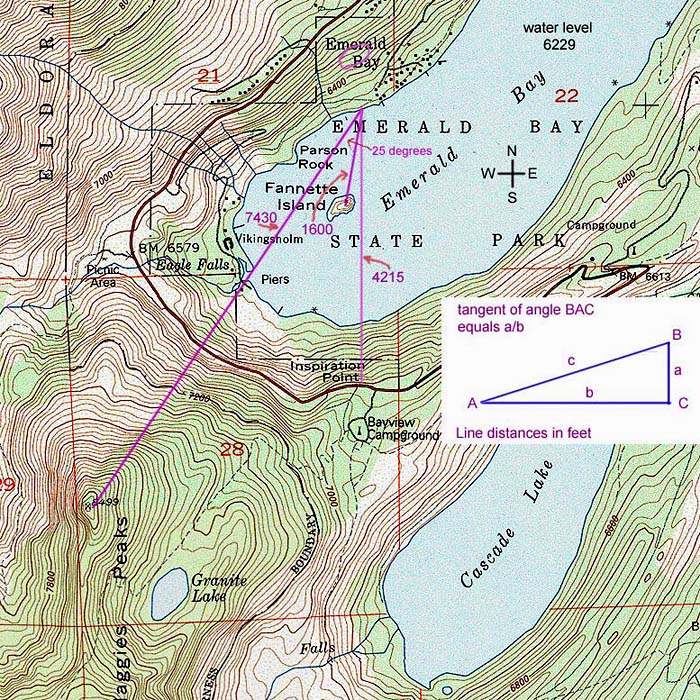
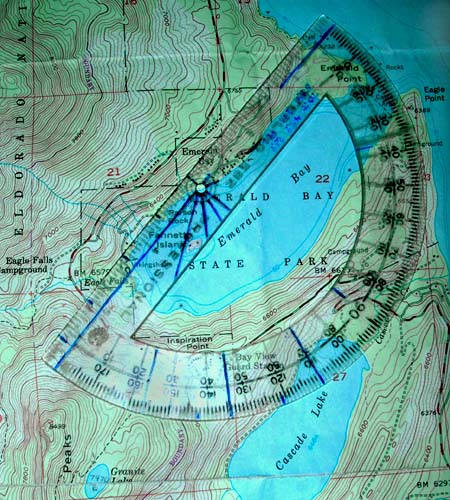
When in the field, I always have a set of 7.5 minute USGS topographic maps in my camera daypack and use them a great deal. Also in my daypack is a small metal protractor with a ruled inch scale along the base. And in a Ziplock bag with various other papers is a pencil and sheet with a simple table of trigonometric tangent ratios versus angles that is shown below. The below two maps pertain to the analysis in the following example. The above map was taken from the 7.5 minute USGS Emerald Bay map. That map has a vertical scale of brown lines each 40 feet and a horizontal scale of about 2.63 inches per mile or 5,280 feet.
Emerald Bay is a famous scenic location of huge Lake Tahoe in California's Sierra Nevada. The water level of Lake Tahoe is 6,229 feet above sea level. State highway 89 routes several hundred feet above and around the bay, here delineated in red. A scenic viewpoint with considerable parking is shown a bit past the text "Eagle Falls". A dark gray line, which is a closed gated road for hiking winds down to the lake from that lot to Vikingsholm. At the second bend in that road at 6,280+, a dimmer gray line, also a road, routes east along the shore towards the black squares that are private summer cabins. A bit west of where that road meets the lake I have drawn three magenta lines. The left line routes to the top of Maggies Peak at 8,499 feet, at 7,430 feet of horizontal distance, the middle line to the top of Fannette Island, at 1,600 feet of distance, and the right to Inspiration Point at 6,800 feet and 4,215 feet of distance.
The Task & Analysis Strategy
The example task here is I will be visiting Emerald Bay with a hope to take a picture with the lake, Fannette Island and some nearby prominent peak in a composition. Upon inspection of the map I see Maggies Peak, so then look for a location along the north shore of the bay where those two features nearly line up. Since I will be visiting during early July when the sun rises at about 60 degrees azimuth or 30 degrees north of due east, I can expect this northeast facing slope of the mountain, the island, and water to all catch early rays not long after sunrise. And with a lot of weather luck, I might hope for a lakeside mirror reflection if I've woken early, had gear ready to go, driven to the parking lot, hiked down the trail, located the shooting position, and set up ones camera gear. Yes bring the alarm clock haha.
Lens Horizontal Field of View with Protractor
One of the first issues would be what lens might be needed to capture a full reflection of that peak in the water? In order to know that I need to know the field aka angle of view of lenses carried and what is the angle of view for the intended subject. As a large format 4x5 photographer, I currently carry three lenses, a 90mm Caltar, 150mm Nikkor, and 300mm Nikkor. The 90mm in landscape orientation has an approximate horizontal angle of view of 70 degrees and a vertical view of 58 degrees reflecting a 4:5 rectangular frame ratio. The 150mm is 46 degrees by 37 degrees, and the 300mm 24 degrees by 19 degrees. I've included that information on my trig table sheet I carry with me. Of course one can find such information on any lens which ought to come with documentation and if not can be found online the Internet easily. And I've marked those angles with a permanent marker on my protractor. At home I tend to use a larger clear plastic protractor that also has the marked lens angles of view. One can use trigonometry with a map to calculate the potential horizontal angle of view of map features, ie cosA= (a^2+b^2-c^2)/(2bc) and tanA=(1-cosA)^-2)/cosA. However that is as mathematically laborious as it appears. Thus it is much easier and more efficient to use a protractor. For this example I wanted the peak and island to be offset a bit and guessed my 150mm lens would probably work. Thus chose a spot along the lakeshore where the peak top and island were offset a tad forming an approximate 20 degree horizontal angle from my viewing position. That would easily fit within the 46 degree width of the 150mm lens plus allow a reasonable amount of the side of the peak and some water east of the island. And I might be able to marginally use the 300mm but would first need to do some additional calculations.
Calculating Subject Vertical Field of View
The map shows Fannette Island with three brown elevations lines to the top. The first is the 6,240 elevation and the third the 6,320 elevation. Thus from the typical Lake Tahoe surface level of 6,229 feet, the top of that island rises about 100 feet upward. With a ruler, I measure the map distance from my shore position to Fannette Island to be about 0.8 inches. At 2.63 inches per map mile at 5280 feet per mile, (0.8/2.63)*5280 = 1,600 feet distance. Standard trigonometric ratios are usually designated with triangle ABC having opposite sides of a, b, and c per the inserted diagram on the map at top. The tangent aka tan ratio is a/b that is also referred to as slope or gradient. Here the tan ratio is the ratio of island height over distance or 100/1600 = 0.0625. From my below table that reflects an angle about midway between 3 and 4 degrees that one might interpolate. At home my caclulator more exactly shows that to be 3.6 degrees. The height angle of view on my 150mm lens is about 37 degrees. Thus the island would only take up about one-tenth the full frame height. Likewise with a ruler I measure the line from my shore position to Maggies Peak to be 3.7 inches. That calculates to be about (3.7/2.63)*5280 = 7,340 feet. Maggies Peak rises to 8,449 feet or 8449-6229 = 2,220 feet above the lake. The trigonometric tan ratio is the ratio of peak height over distance or 2220/7340 = 0.30 that reflects an angle of 16.8 degrees.
To capture a reflection one must not only image the above water real image but also the below water imaginary image that requires the exact same angles above and below. One also expects to usually symmetrically balance the composition by putting the water line at mid frame. So here the full peak image plus reflection would have an angle of view of 16.8*2= 33.6 degrees. So indeed my 150mm with 37 degrees height allows that full subject plus a bit of room for some sky above. My 300mm lens with a 19 degree angle of view height in landscape format would be usable for an image of just Fannette Island to Maggies Peak. A better solution with the 300mm lens would be to walk east a bit to reduce the angle between those two subjects and use a portrait vertical camera orientation that provides 24 degrees of angle of view. From lake level, the island background is a dim green forested ridge a third of a mile of lake water further distant. Thus an even better strategy would be to also climb up about 300 feet on the steep slope behind this position to any open viewpoint where I could image the island fully against lake water providing better separation. That composition would also more graphically show it to be a water surrounded island.
Calculating Visibility of Obstructed Subjects
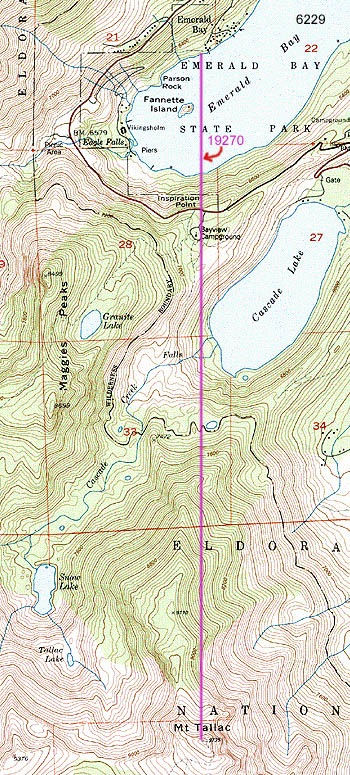
Another feature I notice on the map at page bottom is more distant Mount Tallac. The map shows the ridge across the bay to the south rising up rather abruptly so I wonder if that peak might also be visible from the shore location or blocked by the ridge? I measure the map distance as 9.6 inches. Thus (9.6/2.63)*5280 = 19,270 feet or about 3.6 miles. Mount Tallac rises to a lofty 9,735 feet. That calculates to be 9735-6229 = 3,506 feet above the lake. The tan ratio from my position calculates to be 3506/19270 = 0.177 that reflects an angle of 10.0 degrees. Inspiration Point in direct line with the peak but on the closer ridge at 6,800 feet rises 6800-6229 = 571 feet above the lake. With my ruler I measure the line to that point to be 2.1 inches. Thus (2.1/2.63)*5280 = 4,215 feet. In like manner the tan ratio to that point is 0.135 that reflects an angle of 7.7 degrees. So a bit of often snowy Mount Tallac, the tallest peak on the west side of the lake within Desolation Wilderness would also be in the frame.
I wonder how much of the top of Mount Tallac actually shows? Disregarding the slightly less than vertical right triangle given the distance, subtracting the two angles 10.0-7.7 = 2.85 degrees that my calculator shows to be about a tan ratio of 0.040. In this case 0.04 = height/19270. Transposing terms shows side "a" to be 768 feet. Thus elevations above about 9735-768 = 8,967 feet would protrude above the nearer ridge. And that includes the high forested ridge north of the peak top.
Trigonometric Tan Ratios versus DegreesDeg Tan Deg Tan Deg Tan Deg Tan 0 0.000 23 0.424 46 1.036 69 2.605 1 0.017 24 0.445 47 1.072 70 2.747 2 0.035 25 0.466 48 1.111 71 2.904 3 0.052 26 0.488 49 1.150 72 3.078 4 0.070 27 0.510 50 1.192 73 3.271 5 0.087 28 0.532 51 1.235 74 3.487 6 0.105 29 0.554 52 1.280 75 3.732 7 0.123 30 0.577 53 1.327 76 4.011 8 0.141 31 0.601 54 1.376 77 4.331 9 0.158 32 0.625 55 1.428 78 4.705 10 0.176 33 0.649 56 1.483 79 5.145 11 0.194 34 0.675 57 1.540 80 5.671 12 0.213 35 0.700 58 1.600 81 6.314 13 0.231 36 0.727 59 1.664 82 7.115 14 0.249 37 0.754 60 1.732 83 8.144 15 0.268 38 0.781 61 1.804 84 9.514 16 0.287 39 0.810 62 1.881 85 11.430 17 0.306 40 0.839 63 1.963 86 14.301 18 0.325 41 0.869 64 2.050 87 19.081 19 0.344 42 0.900 65 2.145 88 28.636 20 0.364 43 0.933 66 2.246 89 57.290 21 0.384 44 0.966 67 2.356 90 22 0.404 45 1.000 68 2.475